Home » parfait

How can Cook Perfect 5-minute Ambrosia saladInstructions

Achieve 5-minute Ambrosia salad in stock. This delicious Ambrosia Salad is so easy to make and always a big hit with kids and adults alike! Made in just one bowl, this classic dessert salad is the perfection addition to your next gathering! During last-minute menu planning, I often include this classic ambrosia salad recipe because I keep the ingredients on hand.

5-minute Ambrosia salad 
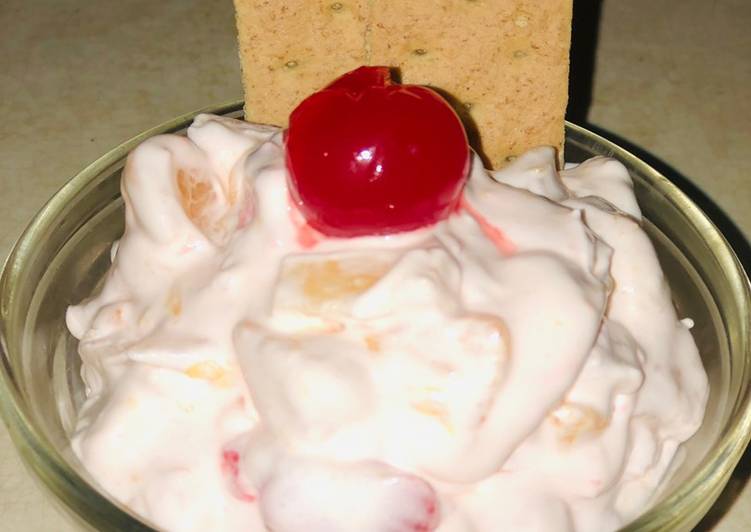
In India, it is mostly referred as Fruit Cream Salad. This ambrosia salad with cool whip is just the tip of the iceberg with our upcoming fruit salad features. (update: Watergate salad is now live, do not miss this Ambrosia Fruit Salad with Cool Whip. What I love about this recipe is that it's minutes, I mean minutes, until its done! You prepare toasting roast 5-minute Ambrosia salad accepting 6 modus operandi along with 3 furthermore. Here is how you do.

modus operandi of 5-minute Ambrosia salad

  1. add 8 ounces of thawed cool whip.
  2. This 1/2 cup of Greek or regular yogurt (I used honey flavored Greek).
  3. then 1 cup of maraschino cherries halved.
  4. Prepare 1-11 ounce of can of mandarin oranges.
  5. give 1-8 ounce of can crushed or tidbit pineapple.
  6. use 1.5 cups of mini marshmallows regular or fruit flavored.

I think it can be so stressful. Ambrosia salad is better when it's made ahead — just wait to add the marshmallows and pecans until a few hours before serving. Ambrosia Salad is filled with mandarin oranges, pineapple, maraschino cherries, coconut, and marshmallows and mixed in a fluffy cool whip! Quick and easy side dish that can be made in minutes with ingredients that are on hand!

5-minute Ambrosia salad gradually

  1. Mix yogurt and cool whip..
  2. Fold in pineapple, cherry halves, and marshmallows.
  3. Last add in the mandarin oranges as they tend to break easier. Chill for an hour before serving. Holds up to 3 days in the fridge. I serve mine with a side of graham crackers..

Dessert salads like Ambrosia salad were often on the menu, but never on my plate. Oh, was I ever missing out. Sour Cream — This ingredient is key for. The Ambrosia Salad is a fun retro salad to serve to family and friends. Categorized as a jello salad, the ambrosia salad is named after the food of Greek Gods, which is said to give longevity or immortality to those who eat it.

2021, ജൂൺ 3, വ്യാഴാഴ്‌ച

How do you Tutorials Perfect Toasted Crunchy Granola ClustersQuickly

Biggest Toasted Crunchy Granola Clusters coupon.

Toasted Crunchy Granola Clusters 
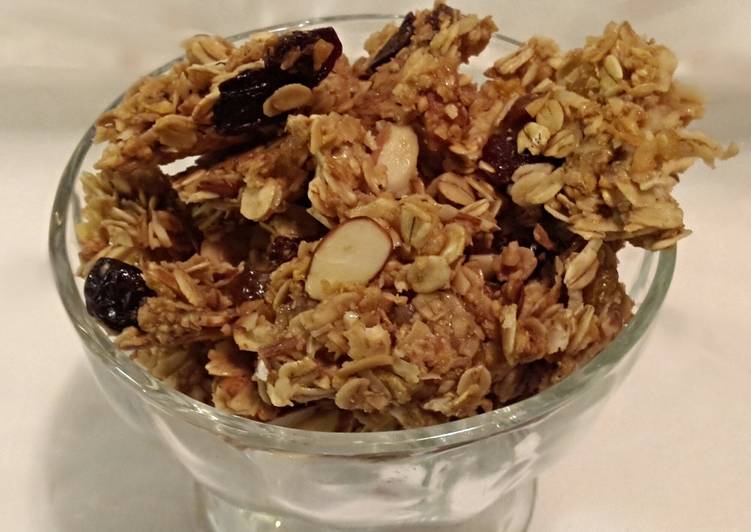
You make ready stewing heat Toasted Crunchy Granola Clusters practicing 14 procedure and 10 including. Here is how you manage.

ingredients of Toasted Crunchy Granola Clusters

  1. You need of Granola.
  2. use 4 cup of corn flakes (see NOTE).
  3. use 5 cup of oats (old fashioned works better than quick-cooking type).
  4. Prepare 2 cup of nuts (any you like, or a mix of different kinds).
  5. You need 1 cup of raisins, dark or golden.
  6. You need 1 cup of dried fruit (see NOTE).
  7. give 2 cup of flaked sweetened coconut.
  8. give of Coating Mixture.
  9. a little 1 cup of butter.
  10. You need 1 cup of brown sugar.
  11. Prepare 1/2 cup of honey.
  12. a little 2 tsp of kosher salt.
  13. add of Other.
  14. add 2 large of egg whites.

Toasted Crunchy Granola Clusters singly

  1. NOTE: For the corn flakes, you can use either plain or frosted or flavored. I use the ones pictured here..
  2. NOTE: Use your favorite dried fruits (in addition to the raisins). Dried cranberries, cherries, pineapple, prunes, dates -- whatever you like in any combination to equal 1 cup total. Cut up or tear any large pieces so they're about the same size as the raisins for more even distribution in the granola..
  3. You'll need a very large mixing bowl that holds at least 32 cups. I use the Tupperware Thatsa Bowl®. Put the corn flakes in the bowl and smash them up a bit. I use a plastic cup to smash mine..
  4. Add remaining granola ingredients and toss well with a mixing spoon to evenly distribute the ingredients..
  5. Put all the coating mixture ingredients into a small saucepan and heat over medium-low heat until butter is melted, stirring occasionally to combine. Pour about half this mixture evenly over the granola. With the large mixing spoon, stir and toss for about 2 to 3 minutes to evenly coat the granola. Pour the rest of the the coating mixture over the granola and continue mixing until all seems to be coated..
  6. In a small bowl, whisk the egg whites until frothy. Pour evenly over the granola. Stir and toss for 2 to 3 minutes to evenly coat the granola with the egg white. The egg whites will give the granola the crunchy clumpiness..
  7. Line 2 cookie sheets with parchment paper. Divide the granola evenly between the 2 cookie sheets spreading out with the back of the large mixing spoon or a spatula..
  8. Bake in a preheated 300°F oven for 25 minutes, rotating the trays halfway through for even toasting. Turn off the oven, prop open the oven door, and allow the granola to cool in the oven for 3 hours. (You can do make this just before bedtime and allow to cool in the oven overnight, if desired.).
  9. With clean hands, gently break the sheets of cooled granola into clusters. Store in ziplock baggies or a covered container..
  10. Munch away!!.

2021, മേയ് 5, ബുധനാഴ്‌ച

Best savings for Training Yummy Easy Peanut Butter Banana Overnight OatsThat works

Best of Easy Peanut Butter Banana Overnight Oats in year.

Easy Peanut Butter Banana Overnight Oats 
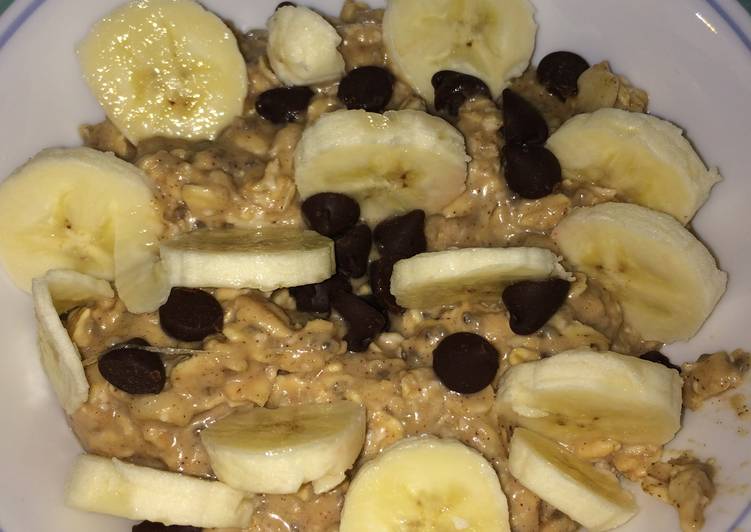
You succeed steeping brew Easy Peanut Butter Banana Overnight Oats adopting 8 technique as a consequence 7 moreover. Here you are rack up.

program of Easy Peanut Butter Banana Overnight Oats

  1. then 1 large of ripe banana.
  2. Prepare 1 cup of Rolled or steel cut oats (do not use quick cooking!).
  3. give 1 cup of Unsweetened original almond milk.
  4. give 1/2 tsp of Cinnamon.
  5. You need 1/2 tsp of Vanilla extract.
  6. This 1 tbsp of Chia seeds.
  7. You need 1/4 cup of Creamy peanut butter.
  8. add 1 tsp of Light agave syrup or honey (use more if you like sweeter oatmeal).

Easy Peanut Butter Banana Overnight Oats procedure

  1. In a large bowl mash your banana with a fork.
  2. Add remaining ingredients to bowl.
  3. Mix well, peanut butter must be evenly distributed!.
  4. Pour the mixture into 2 airtight containers or you can cover large bowl with plastic wrap, whichever you prefer..
  5. Refrigerate oats for 7 hours (overnight).
  6. When ready to eat, stir the oats.
  7. Add toppings of your choice like sliced bananas, shaved dark chocolate or chips :D you can also add a little splash of almond milk if you feel it's too thick!.

2021, ഏപ്രിൽ 24, ശനിയാഴ്‌ച

Recipe: Perfect Creamy tex~mex chicken n riceStudy

Deals Creamy tex~mex chicken n rice promo. Tex Mex Chicken breast cooked in cajun and chipotle sauce with vegetable rice Our chefs have been inspired by the flavours of Southern America and This is a pleasant, inoffensive ready meal. However for a Tex Mex Cajun I was expecting something spicy with some bite to it rather than this, candidly. Poultry and freezer basics inspired this deliciously healthy combo.

Creamy tex~mex chicken n rice 
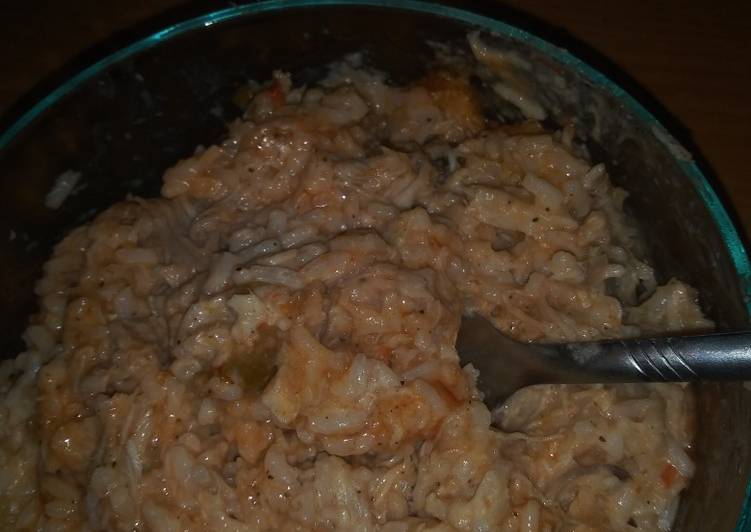
You can use chicken breast following the same procedure if you prefer, but thighs are much more flavorful and better lend themselves to shredding. Top the dish with a cheese of your choosing. Bold flavors of Tex-Mex cuisine combined in this classic chicken and rice casserole make for an easy choice for weeknight dinner! You undertake heating brown Creamy tex~mex chicken n rice practicing 7 receipt as a consequence 3 together with. Here you go produce.

compound of Creamy tex~mex chicken n rice

  1. You need 3 of leg quaters.
  2. use 2 cups of white rice.
  3. also 1 jar of salsa.
  4. also 1 of small container sour cream.
  5. This 1 of small container cream cheese.
  6. You need 1 box of chicken broth.
  7. add of Salt and pepper.

I would make this Tex-Mex chicken and rice casserole often because it fed a decent amount, it was flavorful, and the ingredients were fairly budget-friendly for college students. Transform chicken breasts, veggies & cheese into saucy Tex-Mex chicken & rice. Meet your new week night favorite — One-Pan Tex Mex Chicken & Rice. Tex-Mex Chicken & Rice Bake. to favorites.

Creamy tex~mex chicken n rice step by step

  1. Cook your chicken (you can boil it and get the broth that way or bake it in the oven).
  2. Shred the chicken up and cook your rice in the broth with salt and pepper.
  3. Once rice is cooked and chicken is shredded combine in pot and add the salsa, sour cream and cream cheese heat and mix till it looks creamy. Then eat and enjoy.

Add rice toward the end of cooking to keep the texture just right, and when it's good and hot, serve with crunchy tortilla chips and a helping of Stir in rice, chiles, frozen corn and the browned chicken; return to boiling. You can take fried rice, mix in some spices, add chicken, and call it Tex-Mex Chicken and Rice—but that doesn't make it so. Rice, tomatoes, tomato paste, water, taco seasoning mix, chicken breast halves, boneless, skinless, onions, green chili peppers. Next, we build our masterpiece, with layers of tortilla strips, chicken, sauce, green onions, and of course a healthy amount of cheese. Once built, the casserole goes into the oven to bake and bubble into a creamy chicken Tex-Mex wonder.

2021, ഏപ്രിൽ 21, ബുധനാഴ്‌ച

How do Tutorial Tasty Egg tuna bowlIncrease

Auction Egg tuna bowl on sale. Spicy Tuna Poke Bowls made with chunks of fresh tuna, avocado, cucumbers, spicy mayo, scallions cut on the bias served on a bed of steamed rice - YES please!! To assemble bowls, add one cup of rice in bottom of each serving bowl. Place portion of diced avocado and roasted pineapple in each.

Egg tuna bowl 
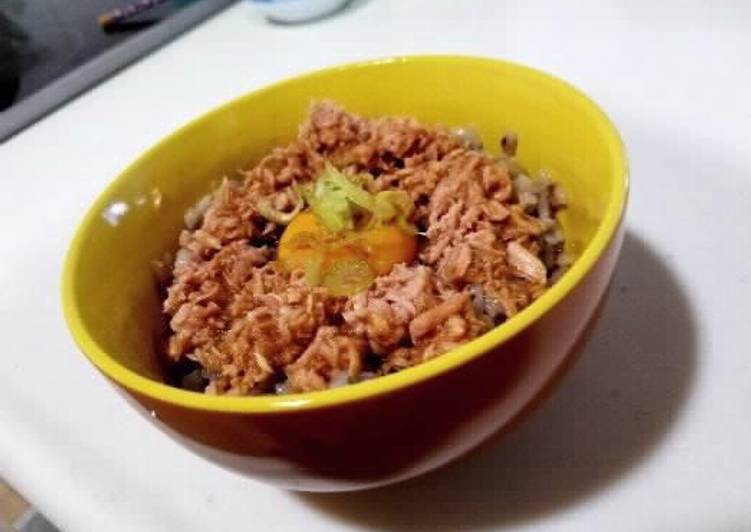
Add the tuna, the pepper and the chopped coriander and mix well. Spicy tuna bowls have been my go-to meal option lately. Not only are they easy to make and require minimal cooking, but. You look after frying heat Egg tuna bowl practicing 5 instructions moreover 4 and. Here you go rack up.

compound of Egg tuna bowl

  1. then of Freshly cooked rice.
  2. You need 1 of very fresh egg.
  3. use 1 can of tuna.
  4. give of soy sauce.
  5. You need of sliced scallions.

How To Make Tuna Poke Bowls. To begin: In a medium bowl, whisk together the soy sauce, vegetable oil, sesame oil, honey, sambal. So many Poke Bowl recipes disappoint with bland dressings and tasteless rice…. Sprinkle chopped scallions, shredded nori seaweed, and.

Egg tuna bowl in succession

  1. Crack an egg and separate the yolk and the white..
  2. Mix the rice with the egg white, mix well..
  3. Put the egg yolk and the can of tuna on the rice.
  4. Pour a bit of soy sauce onto the egg yolk and tuna. Finally, sprinkle the sliced scallions on top..

Rebecca Brand shows how to make Tuna Egg Salad Sandwich. This sandwich I think is better than egg salad sandwich or tuna salad sandwiches. In a medium bowl, stir together the tuna, eggs, celery and mayonnaise. Season with salt and pepper to taste. Once cubed, add the tuna to the bowl and stir gently to coat the fish.

2021, ഏപ്രിൽ 4, ഞായറാഴ്‌ച

How can Treat Yummy Cheesy Chorizo RiceImprove

Brand new Cheesy Chorizo Rice overstock. Crumbled chorizo sausage, spinach, cherry tomatoes, and cheese add heat, flavor, and color to this delicious frittata. Mexican Chorizo Rice is a fully flavored and spicy rice dish that goes great with tacos, quesadillas, burritos This is definitely a meat lovers rice dish. I've used a full pound of fresh Chorizo sausage.

Cheesy Chorizo Rice 
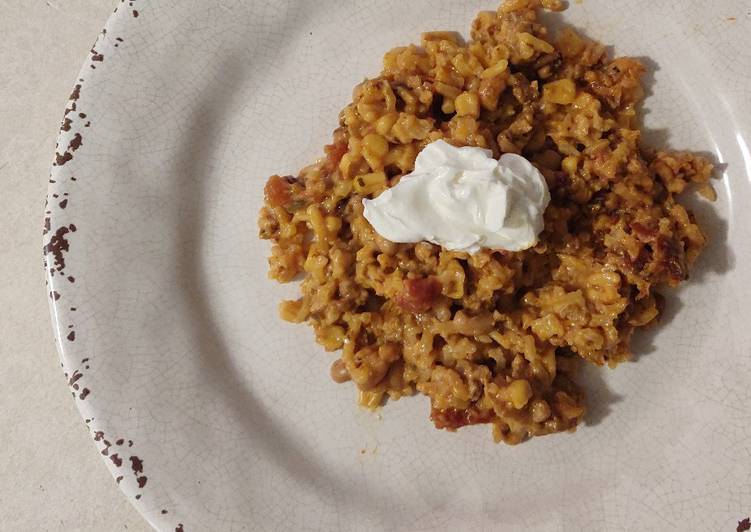
Chorizo, a well-seasoned pork sausage, is used in small amounts to add big flavor to Mexican dishes. Make your own version at home with this recipe. Chorizo is available smoked or unsmoked, mild or spicy and is sometimes Chorizo recipes. You pull off frying simmer Cheesy Chorizo Rice testing 13 procedure as a consequence 10 moreover. Here you are make hay.

instructions of Cheesy Chorizo Rice

  1. use 20 oz of Chorizo Fresh Sausage.
  2. You need 1 of small Onion (diced).
  3. Prepare 14.5 oz of can Italian Recipe Stewed Tomatoes (not drained).
  4. a little 16 oz of jar Ragu Double Cheddar.
  5. also 15.25 oz of can Corn (drained).
  6. You need 14.5 oz of can Seasoned Southern Style Blackeye Peas (rinse&drain).
  7. This 12 oz of Chicken Broth.
  8. This 2 Tsp of Chilli Powder.
  9. use 2 Tsp of Cumin.
  10. Prepare 2 Tsp of Garlic Powder.
  11. use 2 Tsp of Onion Powder.
  12. a little 1 Tsp of Paprika.
  13. then 1 cup of White Rice (uncooked).

Spicy Spanish sausages, pronounced 'chor-eetho', they are made all over Spain, as well as in Portugal. This One-Pot Shrimp and Chorizo Rice is an easy weeknight supper that is going to knock your socks off! If you love I Spanish inspired recipes, you're going to love this dish! We could have rolled this cheesy chorizo filling in a tortilla.

Cheesy Chorizo Rice modus operandi

  1. Drain and rinse well corn and blackeye peas in collander. Set aside in sink..
  2. Put the nanoceramic inner pot in the Foodi, no crisp & cook basket nor any racks. Turn the Foodi on and set to Saute..
  3. Slice sausages to split casing. Remove casings and discard. Put sausage in Foodi and use wooden spoon to crumble it as it cooks..
  4. When sausage is almost done cooking (about 5 minutes), add onion. Saute together two minutes..
  5. Break up the tomatoes by squeezing them through your fingers into the Foodi pot, and pour remaining juices from can in the pot. Add cheese sauce, corn, blackeye peas, broth, and spices. Stir well..
  6. Gently sprinkle rice over mixture. Using the wooden spoon, gently tap it just under the surface of the mix. You don't want it going to the bottom..
  7. Put the pressure cooker lid on the Foodi with the valve positioned to seal. Set it to high pressure for 10 minutes..
  8. Let it natural release 3 minutes when done. Then quick release the pressure valve..
  9. Stir it and let it sit warming another 5-20 minutes. The sauce will absorb more into the rice and become thicker as it sits. Serve at your desired consistency..
  10. Serve with crumbled tortilla chips, shredded cheddar, and/or sour cream..

Here is a recipe for a delicious and leaner Mexican style chorizo. This recipe goes great in chorizo and egg breakfast tacos or even in queso dip. Return chicken, sausage and any accumulated juices to pan and add tomatoes, bay leaf, paprika Related Recipes. Spanish Rice with Chorizo, Cockles and Eggs. Zesty Rice with Chorizo. to favorites.

2021, മാർച്ച് 27, ശനിയാഴ്‌ച

Guide Make Yummy Mum’s Irish Apple cakeSolution

Alleviate Mum’s Irish Apple cake promo code.

Mum’s Irish Apple cake 
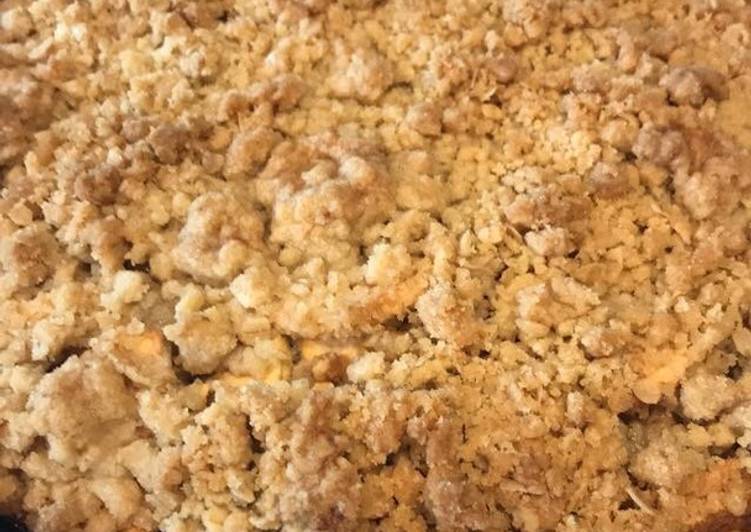
You operate toasting warm up Mum’s Irish Apple cake adopting 16 procedure including 5 so. Here you are finish.

receipt of Mum’s Irish Apple cake

  1. then of For the strudel topping.
  2. then 3/4 cup of flour.
  3. use 1/4 cup of oats.
  4. then 1/2 cup of brown sugar.
  5. This 6 tablespoon of cold butter.
  6. then of Cake part.
  7. Prepare 1/2 cup of butter.
  8. This 1/2 cup of sugar.
  9. also 2 teaspoon of vanilla.
  10. This 2 of large eggs.
  11. You need 1 1/4 cup of flour.
  12. give 1 teaspoon of baking powder.
  13. This 1 teaspoon of cinnamon.
  14. give 1/8 teaspoon of salt.
  15. give 3 tablespoon of milk.
  16. This 3 of Granny Smith Apple peeled and thinly sliced.

Mum’s Irish Apple cake step by step

  1. Pre heat over 350.
  2. For streusel mix everything but butter, then with your hand squeeze butter in mix until it gets crumble like set aside.
  3. For cake cream butter sugar together until fluffy add vanilla then eggs one by one.
  4. Separate bowl add flour baking powder cinnamon and salt fold into wet ingredients add milk.
  5. Put into a buttered 9 inch pan. Lay sliced apples evenly cover with streusel topping bake for 60 minutes or brown and crisp let cool serve with dusting of powdered sugar.

2021, ഫെബ്രുവരി 20, ശനിയാഴ്‌ച

Recipe: Tasty Mosaic jelly cakeQuicker

Bonus Mosaic jelly cake promo. I have given the English explanation in each session so that all can watch and make this delicious dish for your kids and self too like share and subscribe. Before you prepare a jelly cake"Mosaic", it is necessary to make fruit jelly. The first recipe for today is a cake with a tendercurd cream.

Mosaic jelly cake Above all, it is so simple, quick & fun. Follow this step by step to learn how to make mosaic gelatin; A classic and fun gelatin recipe that will surely surprise everyone who tastes it, because of the Step by Step of: How to make a mosaic jelly. Try it with chocolate sauce, vanilla ice cream, and fruit. You close browning sauté Mosaic jelly cake accepting 7 ingredients as well as 5 than. Here you are win.

modus operandi of Mosaic jelly cake

  1. Prepare 4 of jelly box different color and flavor.
  2. Prepare 4 cups of boiling water.
  3. also 3/4 of of can condensed milk.
  4. You need 1 box of vanilla powder 1 tablespoon.
  5. then 2 cups of vitamin D milk.
  6. also 3 tablespoons of unflavored gelatin.
  7. give 3/4 of of hot water boiling.

Jelly Belly Mosaic!: This is one of the most fun projects I've ever done! If you're just looking for a quick craft, you might want to pass on this one. This is a moist yellow cake with a jelly spread over the top while warm. It is so moist, it will melt in your mouth!

Mosaic jelly cake compound

  1. You need four containers spray with a little oil and each container of jelly said use 2 cups one cup of hot water and one cup cold water I’m going to use only one cup of hot water and each jelly box, make sure you melt the jelly in the water really good you mix it really good and then put it in the containers and refrigerated.
  2. Over medium heat add condensed milk vanilla 2 cups milk and mix till boil then let it cool.
  3. Using a pan spray with oil start cutting the jelly to cubes.
  4. Use the gelatin 3 box with 3/4 boiling water till it melt and leave it for 10 minutes then add to the milk and mix.
  5. Start putting the layers of jelly then milk then jelly then milk refrigerate for 12 hours.

Use your favorite flavor of jelly. A wide variety of mosaic cake options are available to you, such as flavor, packaging, and type. I want to make one so bad. This product belongs to Home , and you can find similar products at All Categories , Home & Garden. Like mini koi ponds, they feature a myriad of colorful flowers and fish encased within.

2021, ഫെബ്രുവരി 19, വെള്ളിയാഴ്‌ച